How to Backup and Restore Notebooks in Mac OneNote 16.61?
2022-05-20 14:34
On May 19, 2022, Microsoft updated Mac OneNote to 16.61, and the long-awaited notebook backup and restore function can be used.
Here's a look at how to back up and restore your notebook in Mac OneNote
In Mac OneNote main menu, click “OneNote” menu -> “Preferences…” menu item.
In the OneNote Preferences window, we can see the Backup feature.
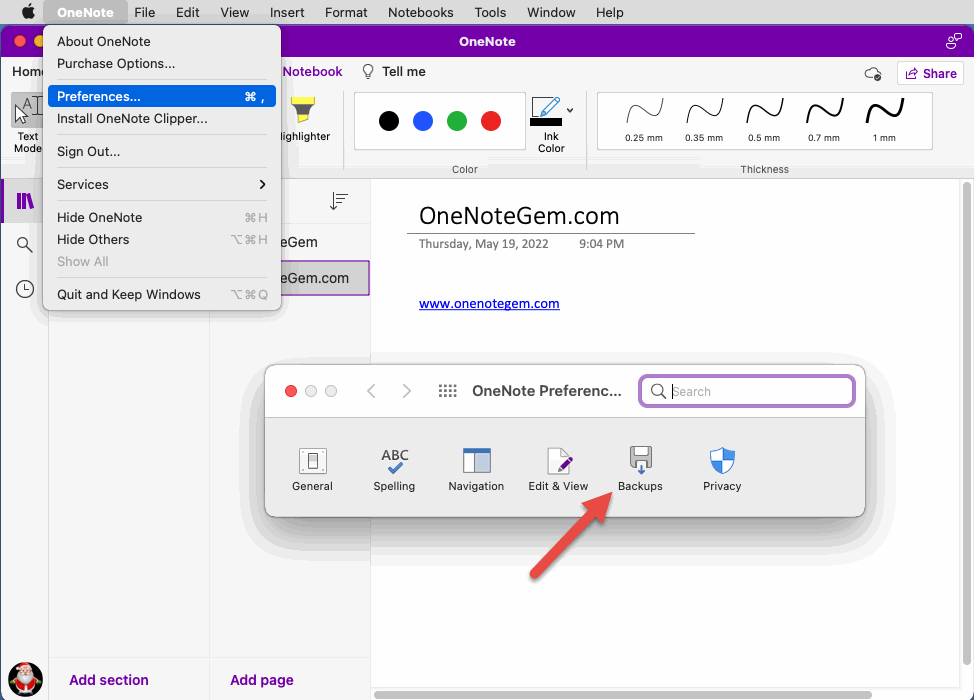
Click on the "Backup" feature. Enter the backup page. There are buttons and checkbox options.
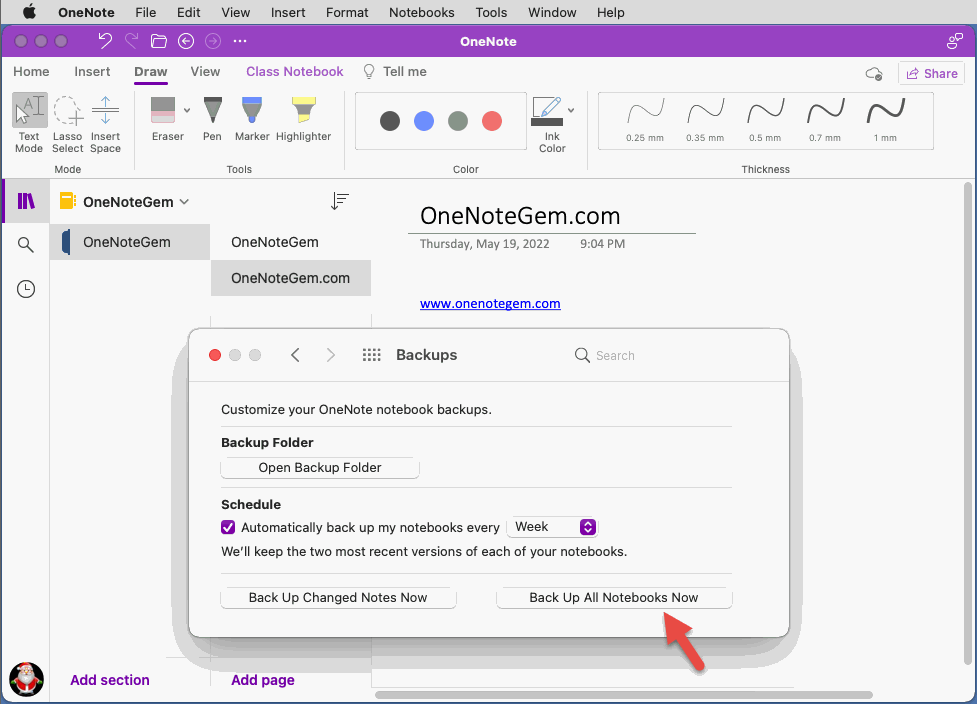
Click on the " Back Up All Notebooks Now " button and then the circle window will appear.
We wait for the backup to complete.
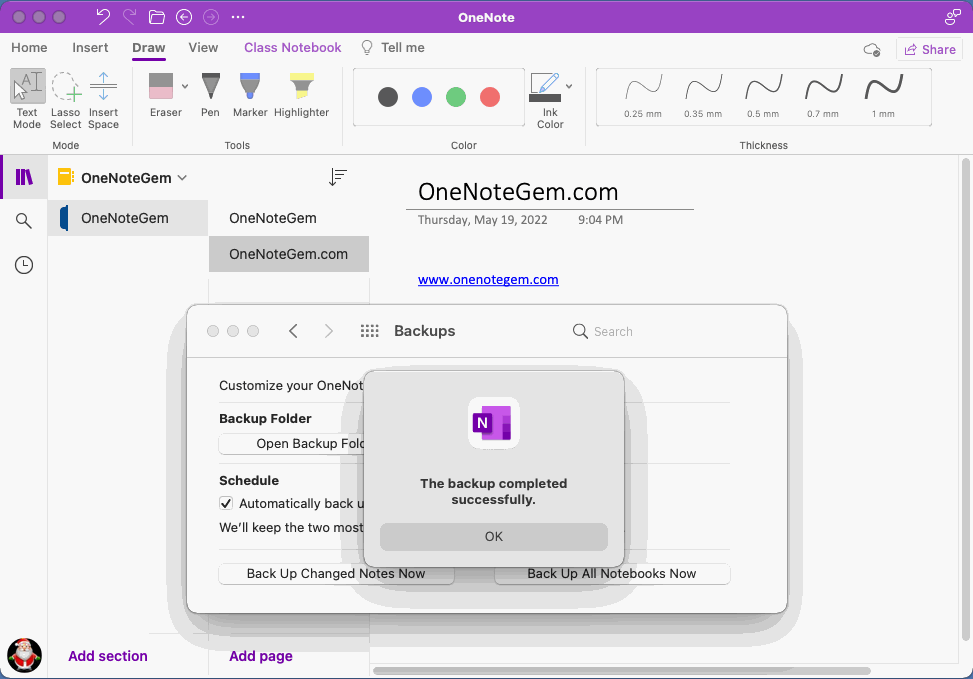
A "The backup completed successfully" prompt box will pop up.
Click on the "Open Backup Folder" button. You can jump to the backup folder of OneNote:
/Users/james/Library/Containers/com.microsoft.onenote.mac/Data/Library/Application Support/Microsoft User Data/OneNote/15.0/Backup
Here we can see that there is a Backup folder. Inside is our notebooks.
Similar to the Backup folder in Windows OneNote. The storage inside is to store each section group and section by notebook folder.
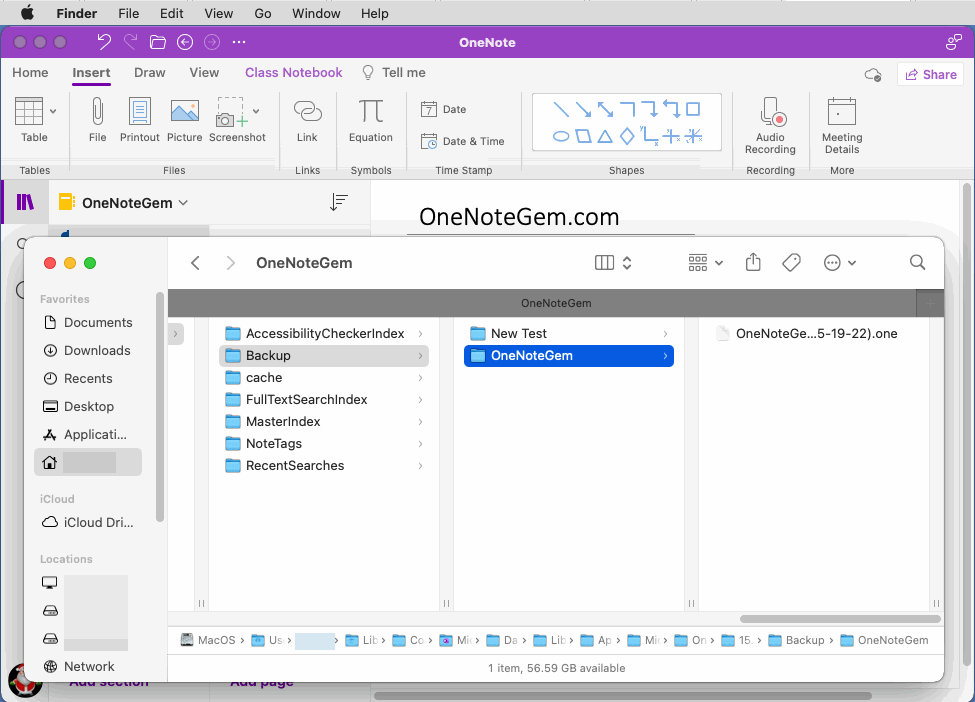
With the .one file, you can do the restore operation.
In the Mac OneNote main menu - > File menu - > “Open Backups” menu item.
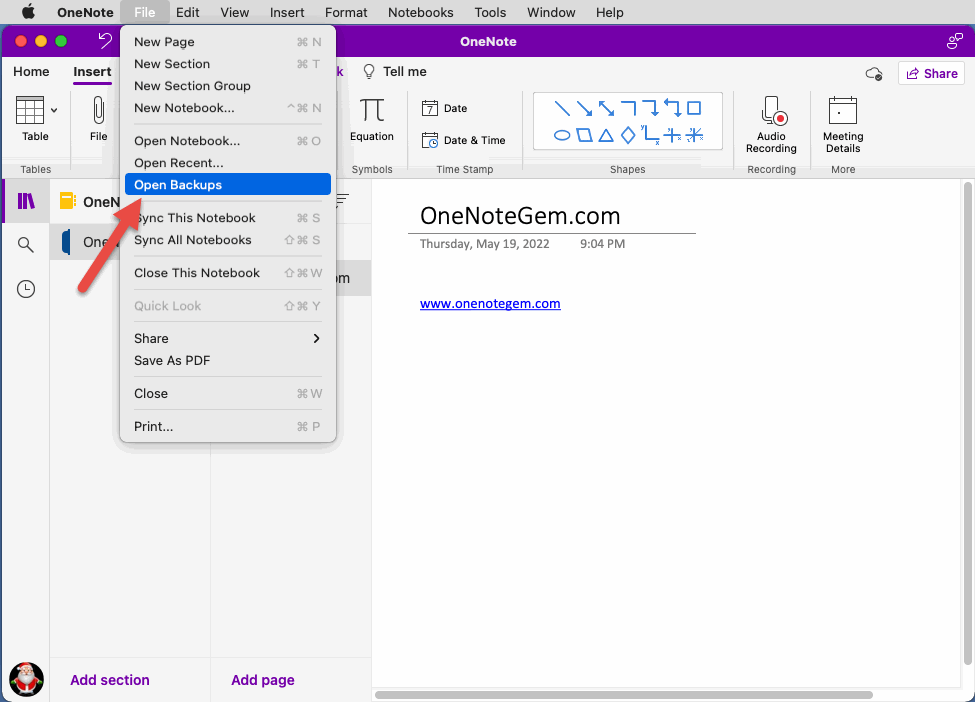
In fact, the "Open Backups" menu item is also open "Open Window".
At the bottom of the Recent Folders list, in Other Locations, there is the Backups folder for your local computer.
Click on the "Backups" folder, and the right side of it will list the notebooks (folders) backed up in the backup folder.
Click a notebook folder and the .one files of the sections is listed to the right.
Select a .one file and the Open button at the bottom of the window will light up.
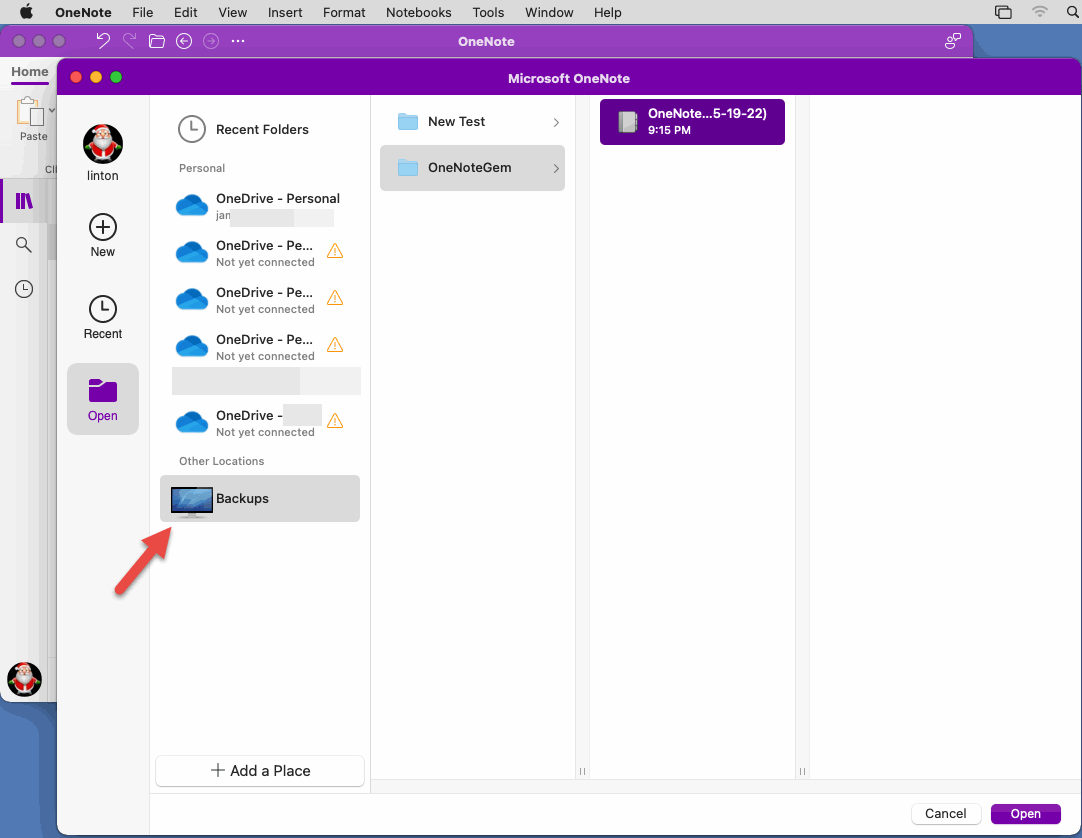
When you click the Open button, OneNote opens the section, but with some differences:
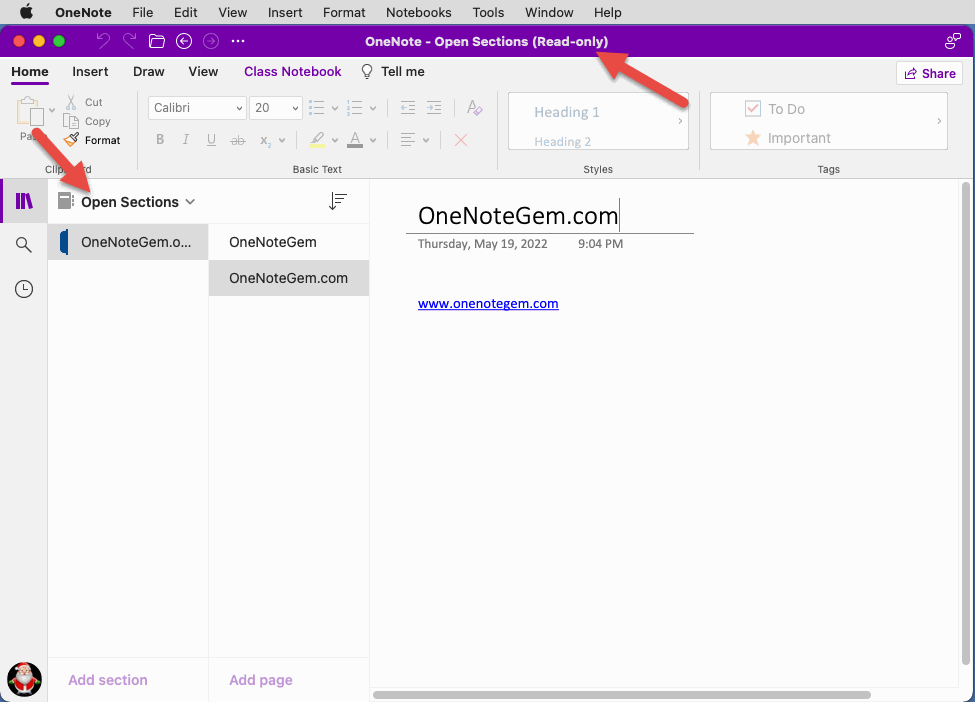
Read-only section that you cannot modify. You can only move the section to an ongoing notebook by right-clicking on the section and using the "Copy or Move" function in the right-click menu.
This makes the section available.
Here's a look at how to back up and restore your notebook in Mac OneNote
Find the Backup Function in the Mac OneNote Main Menu
In Mac OneNote main menu, click “OneNote” menu -> “Preferences…” menu item.
In the OneNote Preferences window, we can see the Backup feature.

Backup Features of Mac OneNote
Click on the "Backup" feature. Enter the backup page. There are buttons and checkbox options.
Backup Folder
“Open Backup Folder” button: Because the OneNote backup folder is very deep, this button quickly and easily opens the folder directly and quickly with the Mac Finder.Schedule
Specifies the interval between automatically backing up notebooks. The default is to take a backup every week."Back Up Changed Notes Now" button
“Back Up All Notebooks Now” button

Back Up All Notebooks Now
Here we test using the "Back Up All Notebooks Now" button.Click on the " Back Up All Notebooks Now " button and then the circle window will appear.
We wait for the backup to complete.
A "The backup completed successfully" prompt box will pop up.

Open Backup Folder
Click on the "Open Backup Folder" button. You can jump to the backup folder of OneNote:
/Users/james/Library/Containers/com.microsoft.onenote.mac/Data/Library/Application Support/Microsoft User Data/OneNote/15.0/Backup
Here we can see that there is a Backup folder. Inside is our notebooks.
Similar to the Backup folder in Windows OneNote. The storage inside is to store each section group and section by notebook folder.
- A notebook is a folder
- A section group is a subfolder
- A section is a .one file (although this file has parentheses and date)

Open Backups Feature
With the .one file, you can do the restore operation.
In the Mac OneNote main menu - > File menu - > “Open Backups” menu item.

Choose a .one File from the Backup
In fact, the "Open Backups" menu item is also open "Open Window".
At the bottom of the Recent Folders list, in Other Locations, there is the Backups folder for your local computer.
Click on the "Backups" folder, and the right side of it will list the notebooks (folders) backed up in the backup folder.
Click a notebook folder and the .one files of the sections is listed to the right.
Select a .one file and the Open button at the bottom of the window will light up.

The Restored Section .one File Opens as Read-only and is Listed in the Temporary Open Sections Notebook
When you click the Open button, OneNote opens the section, but with some differences:
- OneNote opens the backup section as read-only.
- This section is listed in the temporary "Open Section" notebook.

How to Handle Read-only Section?
Read-only section that you cannot modify. You can only move the section to an ongoing notebook by right-clicking on the section and using the "Copy or Move" function in the right-click menu.
This makes the section available.
Related Documents
- Blank Screen or Loading Spinning after Input MS Account and Click Next in Mac OneNote 16.16 Sign In
- Mac OneNote is supported on the 3 most recent versions of macOS
- Mac OneNote: Sync Errors Refresh this notebook to continue syncing. (Error code: 0xE000006C cig68 30115
- Mac OneNote 16.66.1: Sync Error Please refresh this notebook to continue syncing. We couldn’t open this section.
- Resize all PDF Printouts in bulk on a Single Page in Mac OneNote
